
React Hooks simplify state management and lifecycle functions in React apps, eliminating the need for class components. Introduced in React 16.8, Hooks like useState, useEffect, and useContext make React development more streamlined and easier to maintain. Custom Hooks take this further by enabling reusable logic across components without duplicating code.
Key Highlights:
- Core Hooks:
useState: Manages local state in functional components.useEffect: Handles side effects like data fetching or DOM updates.useContext: Accesses shared data without prop drilling.useReducer: Manages complex state logic.useMemo&useCallback: Optimize performance by preventing unnecessary re-renders.useRef: Access DOM elements or store mutable values.
- Custom Hooks:
- Reuse logic like data fetching (
useFetch), form handling (useForm), or local storage management (useLocalStorage). - Simplify code by isolating specific functionalities.
- Promote cleaner, more maintainable components.
- Reuse logic like data fetching (
- Best Practices:
- Always use the
useprefix for hooks. - Keep each hook focused on a single responsibility.
- Use dependency injection and memoization for better performance.
- Test hooks to ensure reliability.
- Always use the
React Hooks have transformed how developers build React apps, offering a simpler, more functional approach to managing state and logic. Whether you’re using core hooks or creating custom ones, they make your code cleaner, reusable, and easier to debug.
Core React Hooks Overview
Now that you know what hooks are and why they matter, let’s dive into the most commonly used React hooks. These essential hooks are the backbone of modern React development, addressing a wide range of component needs. They also set the stage for creating custom hooks, which we’ll explore in the next section.
useState: Managing Local State
useState allows you to add state to function components, enabling your data to persist across re-renders.
This hook returns two things: the current state and a function to update it. When you call the update function, React re-renders the component with the updated state.
Take a counter as an example. You can initialize the state to 0 and use the setter function to increment the count whenever a button is clicked. Each click updates the displayed count and triggers a re-render. Another common use is handling forms - useState captures user input dynamically, keeping the form data in sync with what’s displayed on the screen.
Best practices for useState:
- Use clear, descriptive names for your state variables.
- Always call
useStateat the top level of your function component - never inside loops or conditionals - to avoid unpredictable behavior. - Replace state rather than mutating it. For objects or arrays, create a new copy with your changes instead of modifying the original state directly.
- When the new state depends on the previous state, use the functional form of
setStateto avoid potential race conditions.
useEffect: Handling Side Effects
If useState manages what your component remembers, useEffect handles what your component does. This hook is perfect for performing side effects like fetching data, manipulating the DOM, or setting up event listeners.
useEffect combines lifecycle behaviors (mounting, updating, and unmounting) into a single API. It runs after the component renders. As explained in React’s documentation:
“If your Effect wasn’t caused by an interaction (like a click), React will generally let the browser paint the updated screen first before running your Effect.”
The dependency array is key to controlling when the effect runs. Here’s how it works:
- An empty array (
[]) ensures the effect runs only once after the initial render. - Omitting the array means the effect runs after every render.
- Specifying dependencies limits the effect to run only when those values change.
For example, in a timer component, you might use setInterval to update a counter every second. The cleanup function returned by useEffect ensures the interval is cleared when the component unmounts, preventing memory leaks.
Tips for using useEffect:
- Always clean up effects, especially for subscriptions, timers, or event listeners.
- Use multiple
useEffectcalls to separate unrelated side effects - this keeps your code easier to read and maintain. - Be mindful of dependencies; mismatches can lead to bugs or unexpected behavior.
Other Core Hooks for Advanced Use Cases
In addition to managing state and effects, React offers several other hooks to address specific needs:
useContext: Simplifies access to the Context API by allowing you to directly read context values without needing Consumer components.useReducer: An alternative touseStatefor managing complex state logic, especially when the new state depends on the previous state.useMemoanduseCallback: Improve performance by memoizing expensive calculations and preventing unnecessary re-renders of child components.useRef: Provides access to DOM elements or stores mutable values that don’t trigger re-renders when updated.
Here’s a quick summary of when to use these hooks:
| Hook | Primary Use Case | When to Use |
|---|---|---|
useState | State management | Form inputs, toggles, counters |
useEffect | Side effects and lifecycle | Data fetching, subscriptions, DOM updates |
useContext | Context consumption | Accessing global state without prop drilling |
useReducer | Complex state logic | Managing multiple attributes or complex updates |
useMemo | Performance optimization | Avoiding recalculations for expensive values |
useCallback | Function memoization | Preventing unnecessary re-renders of child components |
useRef | DOM access and mutable refs | Managing focus, storing previous values |
These hooks work together to create a powerful toolkit for building React applications. Mastering their use will help you write cleaner, more efficient, and easier-to-maintain code. With these core hooks under your belt, you’re ready to start exploring custom hooks for even greater flexibility and code reuse.
Building and Using Custom Hooks
Custom hooks are one of the standout features of React. They let you extract reusable logic, helping you write cleaner, more maintainable code. The beauty of custom hooks lies in how they share stateful logic without sharing the actual state. Each component using a custom hook gets its own isolated instance, ensuring everything stays predictable and neatly separated.
How to Build a Custom Hook
Creating a custom hook is a simple and rewarding process. Start by pinpointing repetitive logic across your components. For instance, if you’re fetching data in multiple places or handling similar form validation tasks, that’s a clear sign you could benefit from a custom hook.
Once you’ve identified the logic, move it into a function and give it a name that starts with use. Inside this function, you can use any of React’s built-in hooks, such as useState, useEffect, or useContext, to handle the logic.
Finally, return only what the consuming components need - whether that’s state values, setter functions, or computed results.
Here’s a quick example of a useFetch hook for making API requests:
function useFetch(url) {
  const [data, setData] = useState(null);
  const [loading, setLoading] = useState(true);
  const [error, setError] = useState(null);

  useEffect(() => {
    const fetchData = async () => {
      try {
        setLoading(true);
        const response = await fetch(url);
        const result = await response.json();
        setData(result);
      } catch (err) {
        setError(err);
      } finally {
        setLoading(false);
      }
    };

    fetchData();
  }, [url]);

  return { data, loading, error };
}
This hook wraps all the logic for fetching data, managing loading states, and handling errors. Any component can now call useFetch without having to rewrite the same code.
When building custom hooks, focus on one responsibility per hook. A hook that tries to do too much becomes harder to reuse and understand. To further optimize performance, use useMemo or useCallback to return memoized values when necessary, minimizing unnecessary re-renders.
Common Use Cases for Custom Hooks
Custom hooks shine in a variety of scenarios. Some of the most common include:
- Data fetching: A
useFetchhook can centralize API logic, manage loading states, handle errors, and even implement caching. - Form handling: A
useFormhook can manage form state, validations, and submissions, saving you from repetitive code. - Local storage management: A
useLocalStoragehook can synchronize component state with the browser’s local storage. - Authentication: A
useAuthhook can handle token storage, user sessions, and authentication state across your app. - Theme switching: A
useThemehook can manage light and dark mode toggles for a consistent user experience. - Performance optimizations: Hooks like
useDebounceoruseThrottlecan control how often functions execute, especially useful for search inputs or API calls.
Here’s an example of a useLocalStorage hook:
function useLocalStorage(key, initialValue) {
  const [storedValue, setStoredValue] = useState(() => {
    try {
      const item = window.localStorage.getItem(key);
      return item ? JSON.parse(item) : initialValue;
    } catch (error) {
      return initialValue;
    }
  });

  const setValue = (value) => {
    try {
      setStoredValue(value);
      window.localStorage.setItem(key, JSON.stringify(value));
    } catch (error) {
      console.error('Error saving to localStorage:', error);
    }
  };

  return [storedValue, setValue];
}
Another example is tracking network connection status. A useOnlineStatus hook can detect whether a user is online or offline, allowing your app to adjust its behavior accordingly.
Best Practices for Custom Hooks
To get the most out of custom hooks, follow these best practices:
- Always use the
useprefix: This is essential for React to recognize your function as a hook. - Focus on one responsibility: Keep each hook dedicated to a single task. For example, a hook for authentication shouldn’t also handle theming.
- Choose clear, descriptive names: Names like
useUserSessionoruseApiDatamake it obvious what the hook does. - Use dependency injection: Pass external configurations or services as arguments instead of hardcoding them.
- Optimize with memoization: Use
useCallbackoruseMemoto avoid unnecessary re-renders in components that rely on your hook. - Test thoroughly: Test hooks in isolation to ensure they work as expected, no matter where they’re used.
| Best Practice | Description |
|---|---|
| Naming Convention | Always start with use to distinguish hooks from regular functions. |
| Single Responsibility | Keep hooks focused on one task for better reusability and clarity. |
| Dependency Injection | Pass required services or configurations instead of importing them directly. |
| Memoization | Use useCallback or useMemo to optimize performance. |
| Testing | Test hooks independently for reliability and robustness. |
Organize your hooks by feature rather than type. For instance, group useCart and useCheckout together in a shopping-related folder instead of scattering hooks across a generic directory.
Lastly, ensure your hooks are well-documented. Include examples of how to use them and explain what they return. This helps others - and your future self - understand and use them effectively. Custom hooks are a fantastic way to simplify your React projects, but only when used thoughtfully and with care.
Practical Applications and Examples
React Hooks are a game-changer when it comes to simplifying complex tasks like managing state, fetching data, and handling subscriptions. Let’s dive into some real-world examples that highlight their utility.
Managing Complex State Logic
When your component’s state starts getting complicated - think shopping carts, multi-step forms, or interactive dashboards - Hooks come to the rescue. For straightforward state, useState works fine. But as the logic grows more intricate, useReducer becomes a better option. It centralizes state updates, making your code easier to manage and debug.
Take a task management app, for instance. Users can add, edit, complete, and filter tasks. Using multiple useState calls might result in a messy tangle of updates. Instead, useReducer keeps everything organized:
function taskReducer(state, action) {
  switch (action.type) {
    case 'ADD_TASK':
      return {
        ...state,
        tasks: [...state.tasks, { id: Date.now(), text: action.text, completed: false }],
        taskCount: state.taskCount + 1
      };
    case 'TOGGLE_TASK':
      return {
        ...state,
        tasks: state.tasks.map(task =>
          task.id === action.id ? { ...task, completed: !task.completed } : task
        )
      };
    case 'SET_FILTER':
      return { ...state, filter: action.filter };
    default:
      return state;
  }
}

function TaskManager() {
  const [state, dispatch] = useReducer(taskReducer, {
    tasks: [],
    filter: 'all',
    taskCount: 0
  });

  // Cleaner component logic
}
This method groups related state changes, making it easier to see how actions affect the overall state. Plus, testing becomes simpler since the reducer is a pure function.
Data Fetching and Caching
Fetching data in React can be tricky. The useEffect hook is excellent for handling side effects like API requests, but proper implementation is key to avoiding issues like race conditions or duplicate requests.
Here’s an example of fetching product data:
function useProductData(productId) {
  const [data, setData] = useState(null);
  const [loading, setLoading] = useState(true);
  const [error, setError] = useState(null);

  useEffect(() => {
    let cancelled = false;

    const fetchProduct = async () => {
      try {
        setLoading(true);
        setError(null);
        const response = await fetch(`/api/products/${productId}`);
        const product = await response.json();

        if (!cancelled) {
          setData(product);
        }
      } catch (err) {
        if (!cancelled) {
          setError(err.message);
        }
      } finally {
        if (!cancelled) {
          setLoading(false);
        }
      }
    };

    fetchProduct();

    return () => {
      cancelled = true;
    };
  }, [productId]);

  return { data, loading, error };
}
The cleanup function ensures outdated requests don’t overwrite newer data when productId changes quickly. To boost performance further, caching strategies like useMemo can help avoid unnecessary recalculations:
function ProductList({ category, sortBy, products }) {
  const cachedProducts = useMemo(() => {
    return products
      .filter(product => product.category === category)
      .sort((a, b) => (a[sortBy] > b[sortBy] ? 1 : -1));
  }, [products, category, sortBy]);

  return (
    <div>
      {cachedProducts.map(product => (
        <ProductCard key={product.id} product={product} />
      ))}
    </div>
  );
}
For search functionality, a custom useDebounce hook can delay API calls until the user stops typing, improving server performance and user experience:
function SearchResults() {
  const [searchTerm, setSearchTerm] = useState('');
  const debouncedSearchTerm = useDebounce(searchTerm, 300);
  const { data: results, loading } = useSearch(debouncedSearchTerm);

  return (
    <div>
      <input
        value={searchTerm}
        onChange={(e) => setSearchTerm(e.target.value)}
        placeholder="Search products..."
      />
      {loading ? <Spinner /> : <ResultsList results={results} />}
    </div>
  );
}
Handling Subscriptions and Cleanup
Hooks also shine when it comes to managing real-time subscriptions and resource cleanup. Features like live notifications, chat applications, or WebSocket connections require careful handling to avoid memory leaks. The cleanup function from useEffect ensures resources like subscriptions or event listeners are properly released.
For example, here’s how to manage a WebSocket connection:
function useChatRoom(roomId) {
  const [messages, setMessages] = useState([]);
  const [connectionStatus, setConnectionStatus] = useState('connecting');

  useEffect(() => {
    const socket = new WebSocket(`ws://chat-server.com/rooms/${roomId}`);

    socket.onopen = () => {
      setConnectionStatus('connected');
    };

    socket.onmessage = (event) => {
      const message = JSON.parse(event.data);
      setMessages(prev => [...prev, message]);
    };

    socket.onclose = () => {
      setConnectionStatus('disconnected');
    };

    return () => {
      socket.close();
      setConnectionStatus('disconnected');
    };
  }, [roomId]);

  return { messages, connectionStatus };
}
Similarly, event listeners need proper cleanup to prevent memory issues:
function useWindowSize() {
  const [windowSize, setWindowSize] = useState({
    width: window.innerWidth,
    height: window.innerHeight,
  });

  useEffect(() => {
    function handleResize() {
      setWindowSize({
        width: window.innerWidth,
        height: window.innerHeight,
      });
    }

    window.addEventListener('resize', handleResize);
    return () => window.removeEventListener('resize', handleResize);
  }, []);

  return windowSize;
}
For interval-based updates, clearing intervals when components unmount is equally important:
function useCountdown(targetDate) {
  const [timeLeft, setTimeLeft] = useState(calculateTimeLeft(targetDate));

  useEffect(() => {
    const timer = setInterval(() => {
      setTimeLeft(calculateTimeLeft(targetDate));
    }, 1000);

    return () => clearInterval(timer);
  }, [targetDate]);

  return timeLeft;
}
These examples demonstrate how Hooks can simplify complex tasks, making your React applications more efficient and easier to maintain. By combining state management, data fetching, and cleanup logic, Hooks bring clarity and structure to your codebase.
Improving Productivity with Hoverify
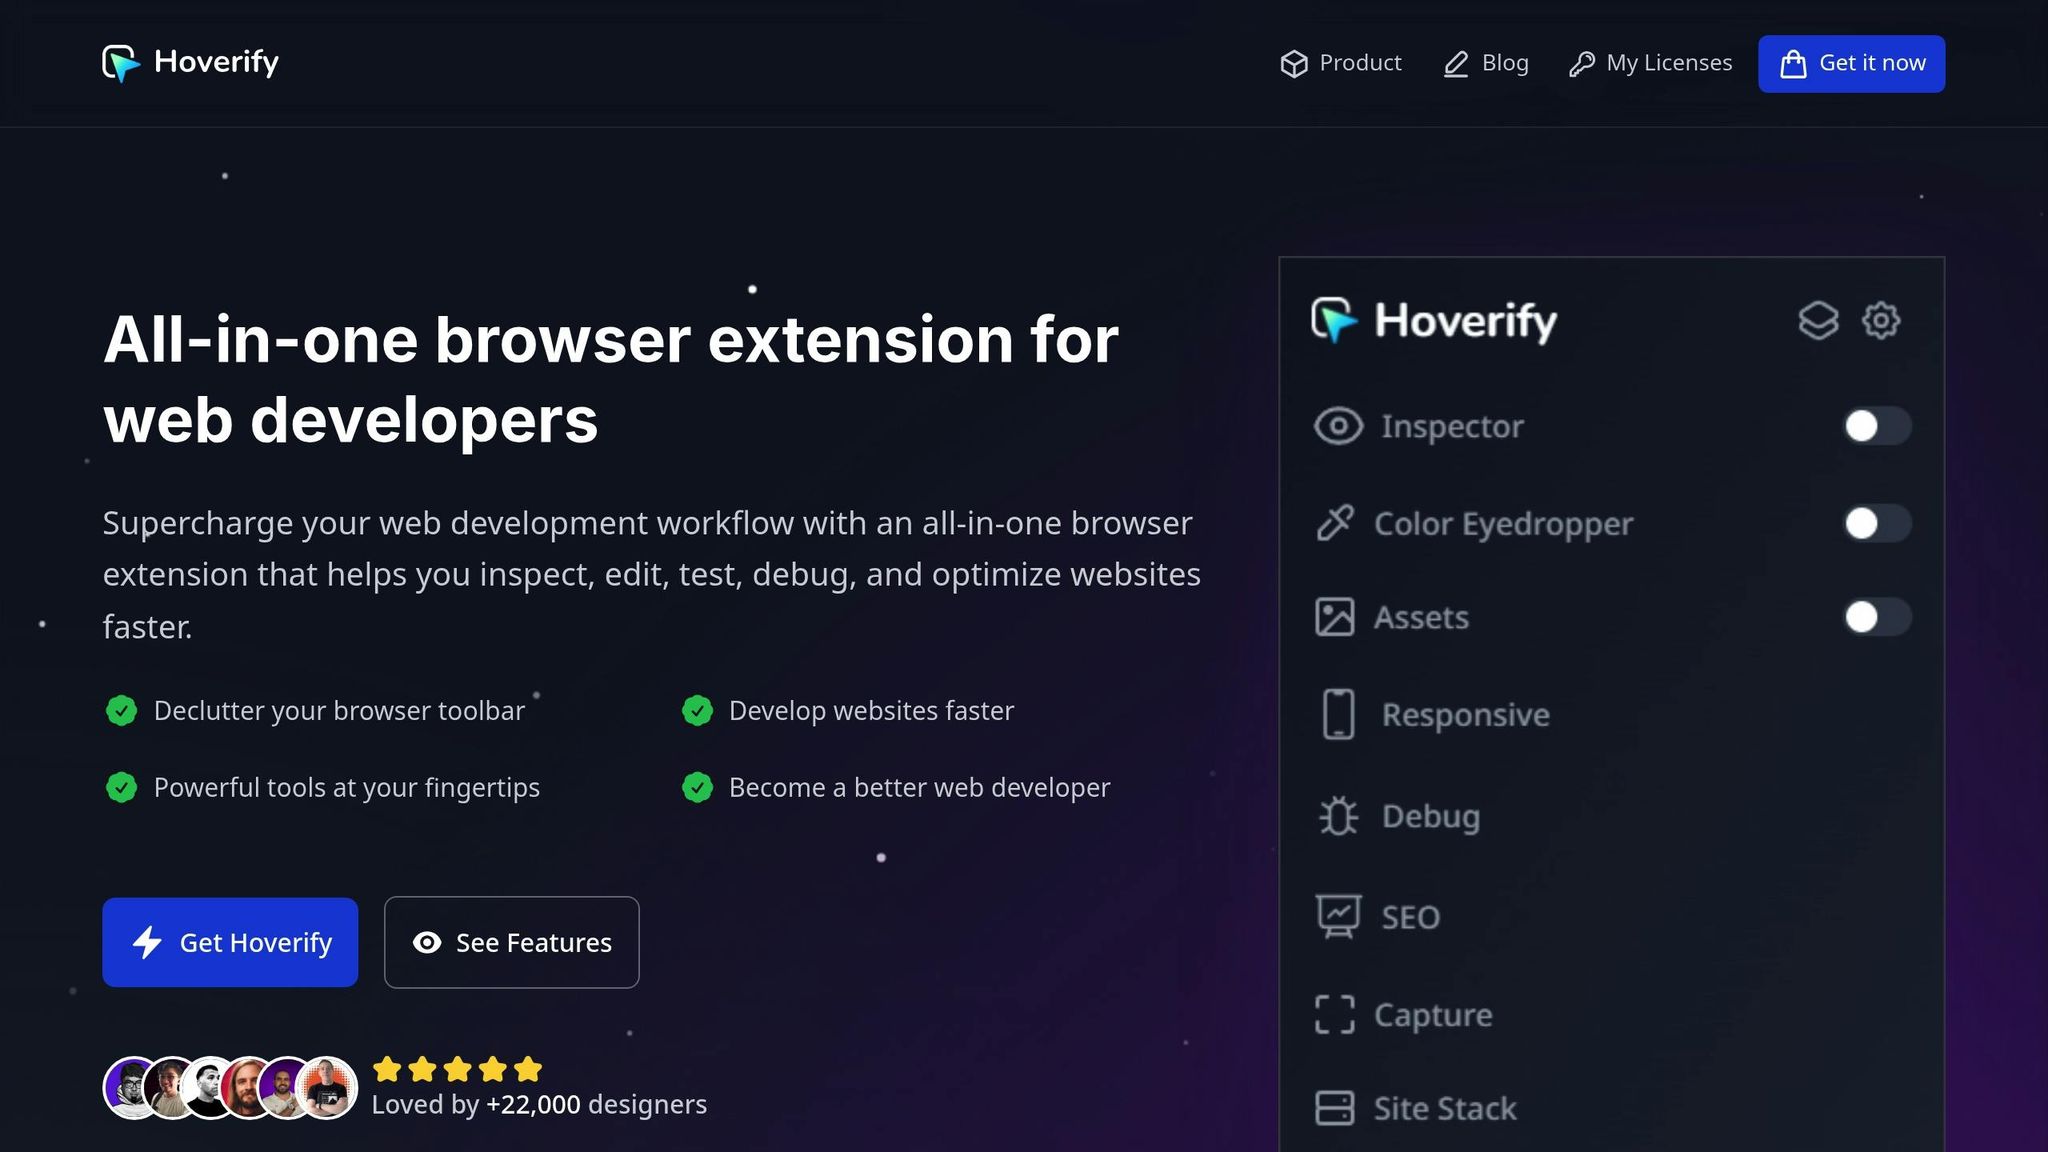
Hoverify takes the efficiency of React Hooks to the next level by bringing essential development tools together in one place. If you’ve ever found yourself constantly switching between tools to inspect components, debug state changes, or test responsive behavior, Hoverify can simplify your workflow. This browser extension streamlines these tasks, making it easier to manage hook-based components.
Key Hoverify Features for React Developers
One standout feature of Hoverify is its Inspector tool, which is a game-changer when debugging components that rely on hooks. Instead of diving into developer tools every time you want to see how a hook impacts the DOM, you can just hover over elements to instantly inspect their HTML and CSS properties. This is especially helpful for custom hooks that modify styles or create state-driven visual changes.
Another must-have is the Responsive Viewer, designed to ensure your components behave as expected across different screen sizes. Forget the hassle of manually resizing your browser or testing on multiple devices. With Hoverify, you can preview multiple viewports at the same time. Actions like clicking or scrolling in one preview automatically update the others, making it easy to catch and fix inconsistencies in how hooks respond to various screen dimensions.
Hoverify also offers tech stack analysis, which helps identify potential conflicts between libraries in your React app. This is particularly useful when your custom hooks depend on third-party integrations. Together, these features make debugging and development more streamlined.
“Found an incredibly useful web design / development tool called Hoverify. Allows you to inspect elements on any site, copy styles, show grids, check on different viewports, grab asset lists, hide elements, and a whole lot more.” - Madhu Menon
Using Hoverify to Debug Hook-Based Logic
Hoverify doesn’t stop at visual inspection. It also simplifies debugging for hook-based logic. For example, its tools can clear browsing data or inject custom code, which is crucial when hooks interact with localStorage, sessionStorage, or cached data. If your components handle images or media assets, Hoverify’s image optimization feature can help pinpoint performance issues, such as slow loading states or unnecessary re-renders.
Improving Workflow with Hoverify
React Hooks already make state management easier, but Hoverify takes it further by combining inspection, debugging, and testing into a single tool. This consolidation is especially helpful for developers in fast-paced environments, like those in the U.S., who might be juggling multiple projects or working under tight deadlines.
Hoverify is trusted by over 22,000 developers and is compatible with Chrome, Firefox, and Chromium-based browsers like Brave and Edge. It ensures reliable performance no matter which environment you prefer.
Another feature worth mentioning is the visual editor, which lets you style elements directly in the browser. Instead of repeatedly tweaking code, saving, and refreshing to see changes, you can make adjustments in real time and then apply those styles to your React components.
“My go-to browser extension when building websites. The support is amazing and very responsive.” - Mike Oliver
Hoverify is available for $30 per year or $99 for a lifetime license. Considering how much time it saves by integrating debugging, inspection, and testing tools, it often pays for itself after just a few projects involving complex React applications with hooks.
Conclusion
React Hooks have reshaped how developers manage state and component logic in React. From foundational tools like useState and useEffect to more advanced custom hooks, they simplify functional components while reducing the need for class-based complexity.
Key Takeaways from React Hooks
React’s functional approach shines through its hooks, offering both simplicity and flexibility. Here are some highlights:
- useState and useEffect are the cornerstones of most React applications. They handle local state and side effects with ease. As your app scales, hooks like useReducer step in to manage more intricate state logic, while useMemo and useCallback help fine-tune performance by avoiding unnecessary re-renders.
- Custom hooks embody React’s modularity by letting you extract reusable logic into standalone functions. Whether you’re fetching data, managing forms, or handling animations, custom hooks keep your components cleaner and your code more organized.
- The Rules of Hooks are essential: always call hooks at the top level of your React functions and only within React components or custom hooks. Adhering to these rules - and using tools like ESLint’s
react-hooks/exhaustive-depsrule - ensures predictable behavior and stable applications.
Starting with the basics and gradually adopting advanced patterns allows you to fully harness the power of hooks.
Using Tools Like Hoverify
Efficient hook-based development is further enhanced by the right tools. For example, Hoverify offers features that simplify debugging and inspection:
- The Inspector tool lets you hover over elements to quickly understand how hooks influence component behavior without needing to switch to external developer tools.
- The Responsive Viewer ensures your components render consistently across different screen sizes, a must-have in today’s development landscape.
Hoverify combines inspection, debugging, and testing into a single workflow, saving time and boosting productivity - especially when working on complex React applications with multiple hooks.
FAQs
What mistakes should I avoid when using React Hooks, and how can I use them effectively?
When working with React Hooks, it’s easy to run into a few common pitfalls. One frequent issue is overloading components with too many stateful hooks, like useState, which can make your code harder to follow and maintain. Another mistake is breaking the Rules of Hooks by calling them conditionally or inside loops. This can lead to bugs and unpredictable behavior that are often tricky to debug.
To make the most of hooks, always call them at the top level of your components. This ensures a predictable execution order. Additionally, organize your state and effects thoughtfully to keep your logic clear. If you find yourself repeating logic across components, think about creating custom hooks. Custom hooks help you write cleaner, more reusable code, which ultimately makes your application easier to manage and expand.
When should I use custom hooks instead of core React hooks in my application?
When deciding between custom hooks and core React hooks, it all comes down to what your application needs in terms of code reuse and structure. Core hooks like useState and useEffect are perfect for handling local state and managing side effects within a single component.
But if you notice the same logic being repeated across multiple components, it’s time to consider creating a custom hook. Custom hooks let you bundle and reuse logic, keeping your code more organized, easier to manage, and scalable. They’re particularly useful in larger projects where maintaining consistent patterns and improving readability is key.
How can I test custom React hooks to ensure they work reliably and perform well?
To test custom React hooks effectively, tools like React Testing Library’s renderHook() come in handy. They allow you to isolate the hook and evaluate its behavior independently. Use act() to simulate interactions, ensuring state updates are processed correctly before making assertions. This approach helps you check how the hook handles various states and edge cases.
Focus on testing what the hook does rather than its internal workings. This keeps your tests adaptable and ensures they reflect how the hook will perform in actual use. By sticking to these methods, you can confidently assess the reliability and performance of your custom hooks.
